
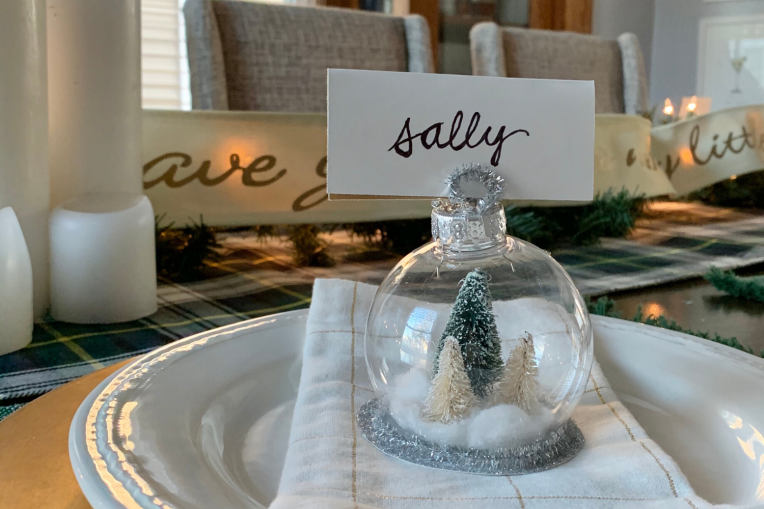
Spoiler! I love decorating and hosting get togethers and I especially love transforming our house into a Christmas wonderland. Included in that Christmas wonderland is playing around with our dining room decor and making a statement with our tablescape. I love shopping on Pottery Barn, we registered for our wedding there and I always find a few gems, especially seasonal ones that I grab when they’re on sale or occasionally splurge on. So long story short, I saw these Village Snow Globe Place Card Holders and was about to splurge — until I was like, wait it would be super fun to make those!
What You’ll Need:
– Plastic ornaments
– Mini wire brush trees, animals or houses – shop Christmas Village decor at Michaels. I bought (2) mini white trees and (2) green tree set
– 12×12 Glitter scrapbook paper/card stock, silver glitter and glue
– Craft sparkle pipe cleaners, same color as glitter/paper, I used silver
– Cotton balls
– Uline knife
– Hot glue and mod podge
Estimated total project cost: $25
Step-by-Step:
1. First things first, you’ll need to cut a opening in the bottom of your plastic ornaments. This was a bit tricky to figure out, and should be done very carefully! I used a sharp mini philips head to poke a hole in the bottom. Once I had a hole, I used a Uline knife to cut a smaller circle for the opening, go slow and wear gloves to protect your hands. Repeat based on the number of place settings you’re making – this is the least fun part of the whole project!
 2. Woo! We have our openings, so now it’s time to cut our our bases and start planning our wintry scene. I used thicker card stock, that I ended up painting and putting glitter on — I would highly recommend buying scrapbook 12×12 glitter paper. This would’ve saved time and a mess. *smiles* So using your thicker paper, trace a circle using a drinking glass that is rounder than your ornament, trace and repeat to cut the same number of circles as you have ornaments. These are your bases!
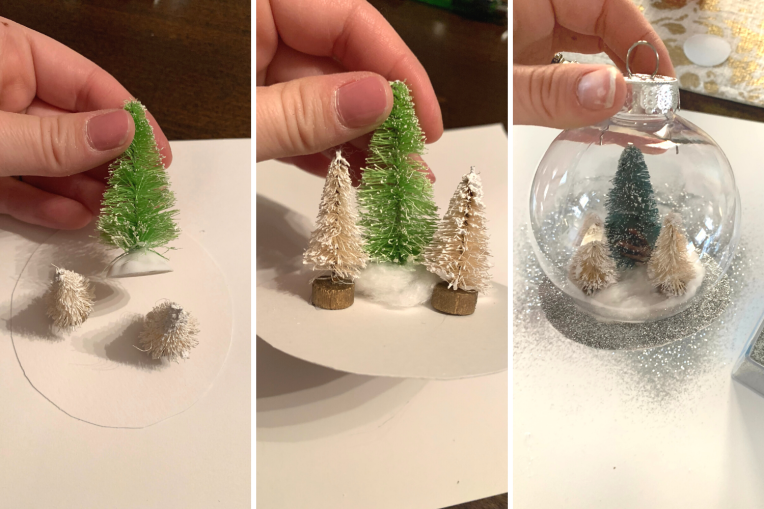
3. Working from the center of your circular base play around with your mini trees/houses or animals. Once you have your scene figured out it’s time to glue in place! I started with my larger wire brush tree in the center, and flanked either side with smaller ones. Pull a cotton ball apart and shape around the base of the trees and glue into place. Wah-la, snow! Repeat, or switch up to have different variations.
Pro-tip: Don’t go to far from the center, so that you’re ornament can fit around your wintry scene especially the cotton ball snow
4. Once you have your bases decorated, glued and secured — place ornaments overtop, making sure everything is fitting within the ornament. Glue and secure the base of the ornament with hot glue!
 5. Now, depending on if you bought glitter paper or not, this step may not be needed. Using mod podge glue I painted the top of the white paper bases and then covered in silver glitter over a paper plate to catch the excess. I had to touch up a few spots once the glue dried and I dumped the remaining glitter off to see emptier spots. If you bought glitter paper, you are 10-steps ahead of me!
6. Time for finishing touches! Get that hot glue back out and glue the pipe cleaners around the base where your ornament meets the base. You’ll most likely need to trim for an even meet at the back. I then used the left over scraps of the pipe cleaner to create a circle to loop into the top of the ornament to hold place cards for guests! I used old place cards that we didn’t use from our wedding, but you can cut and customize as you want or not include!
7. Once your mini snow globes are created, it’s time to set the table and get ready to host a delicious meal with close friends and family!
")
")
This was such a fun DIY and I love how they turned out. For $25 I created 8-mini place setting snow globes compared to spending nearly $60 at Pottery Barn — plus I made them! I must admit figuring out how I was going to cut and create this using ornaments had be puzzled for a while, and it took a few trial and errors before I figured out how to cut the hole in the bottom. And I really wanted to use ornaments vs. mason jars or other types of glass cylinders I saw online. So once I figured it out and put it all together I was so excited! The best part is you can keep and use year after year or send home with guests as a little keepsake <3.
Happy Holiday Hosting!


3 thoughts on “DIY – Holiday Snow Globe Place Settings”